Explore / RFID Basics & Resources
RFID Basics - Printers and Label Applicators
TYPES OF RFID PRINTERS
Printers come in several varieties, including the following:
• Plain label printers, which can use pre-encoded smart labels and print information on them
• Printer encoders that print information on the label and then encode the tag with an EPC number or with another relevant data representation for the product to which it is attached
• Printer encoder and applicators, which print information on the label, encoded with the identifying number, encode the RFID tag with the proper identification, and then automatically apply the label to the box

The following photos show several types of RFID-enabled printers. Many of these are designed in industrial-strength boxes typically made of metal for use in heavy industrial environments where exposure to dust, temperature, high humidity, and other extremes are likely.
ZEBRA RFID PRINTER ENCODER
MEDIA LOADING
Take care to follow the proper paper path for the media when loading a printer, as this is imperative to the printer’s success when attempting to encode smart labels. The print path is typically shown on the backboard of the printer when you open the side cover, as shown. You must align the media coming off the spool with the line painted on the backboard of the printer as you feed it into the print
head.
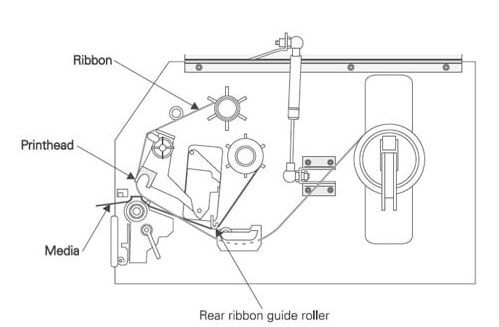
INSIDE OF AN RFID PRINTER
TAG ENCODING
The printer must isolate the individual tag to which it is writing during the print process. For this reason, RFID printers have integrated a very low power reader with an antenna designed to read tags that are in close proximity. This requires proper alignment of the RFID tag within the label and within the print pad.
Tip: Know that writing to a tag requires more time and power than reading from a tag, so this means that a writing application will be a lot slower than simply reading the tag and applying it to the box.
The following sequence of events takes place to print and encode a label:
• The printer receives a command and data from the host computer.
• The label is positioned so that the reader can check for null data on the tag. Null data is placed in a tag by the tag manufacturer to indicate that the tag has passed the manufacturer’s quality control. A quiet tag that was pre-identified at the manufacturer will not have null data written; therefore, this tag will be automatically rejected. The printer does not attempt to program this tag and does not self-test the tag for any signal strength but simply rejects it.
• If the tag passes a validity check, the printer will write data to the tag and then verify the data it has just written.
• If the verification fails or the tag does not respond with the appropriate signal strength, the tag is marked with a special void mark; it is then rejected, and the process is repeated on the next label.
• Once the tag is successfully encoded, the barcode and other information is printed onto the label and an acknowledgement is sent back to the host. This acknowledgement contains the serial number that was just written to the RFID tag, as well a successful print signal.
• The printed and encoded label is now presented to the user for application to the package.
PRINTER SETUP
Proper printer setup is extremely important for successful printing. The most important setup parameters for RFID enabled barcode printers are these:
• Label dimensions Typical sizes for these are 4×1, 4×2, 4×4, and 4×6 inches.
• The distance between two consecutive labels This measurement combined with the label length determines how far the printer will advance to print/encode the next label.
• The location of the inlay within the label Some RFID enabled printers offer the ability to move the antenna along the length of the label. This is usually specified when the labels are ordered to ensure compatibility with a specific manufacturer’s printer.
• The inlay type Some printers have settings that allow you to set the specific manufacturer and model of the inlay being used in the printer.
• The inlay protocol If a generic tag size is chosen without specifying the make and model of the inlay, a tag protocol will need to be defined. This lets the encoder know what air and data protocol to use when communicating with the tag.
• The dimensions for various print zones This setting is typically found in the software driving the printer. When formatting the label print area, this portion can be used to set up the printer to avoid printing on the portion of the label containing the tag. This area can cause artifacts on the printed label that can make portions of printed information unreadable.
• The feed rate for the printer This is used to control how fast the printer moves the labels through the print area.
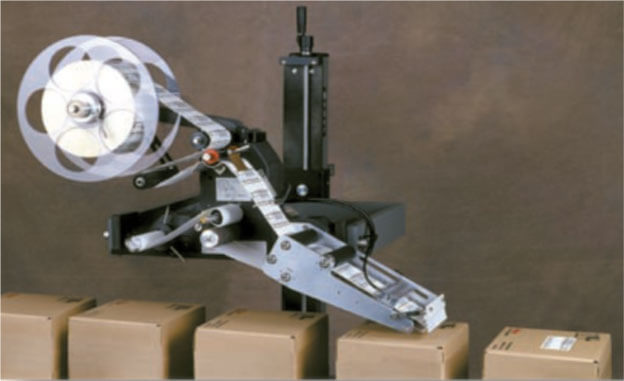
AUTOMATIC LABEL APPLICATORS
Automatic label applicators are used for integration of RFID into an automated process. They can typically print on the face of the label and encode the RFID tag that is embedded within it. Then this label is placed in a predetermined location on objects as they pass. Speeds vary according to the technology used and the application method employed.
There are two main types of RFID encoder printer applicators or automated printing code and apply devices:
• Pneumatic piston label applicators, also called tamp or blow applicators, have a pneumatic tamp head that pushes labels onto the object at a precise moment to ensure specific placement with every label.
INSIDE OF AN RFID PRINTER
• Wipe on label applicators simply present the tag adhesive side toward the package at the proper time in the manufacturing line for the adhesive side to grab the side of the object to adhere the media in the same spot on the side of the box every time.
Setup and configuration of automatic label applicators involves same installation procedures as a smart label printer, with addition of a few extra steps:
• Immediately after connecting the unit to power, connect it to an air supply that meets the manufacturer’s specifications.
• During the configuration portion of the installation, special adjustments may need to be made to reflect the proper timing of the application process, position and orientation of the label, stroke of the pneumatic assembly, and pressure to be exerted on the label. These settings are specific to the manufacturer, so be sure to consult the manual while installing the unit.